Description
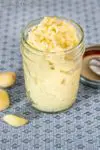
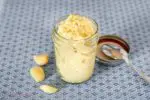
Homemade garlic paste can be a huge time saver in the kitchen. It’s ready to go whenever you need it, with no mincing, slicing, crushing, or grating required!
Ingredients
- 1 pound peeled garlic cloves
- 2 tablespoons (1 ounce) neutral flavored oil, plus more for topping – see notes
Instructions
- Cut away any bad spots from the garlic cloves.
- If your blender or food processor is not very powerful, cut the garlic cloves in quarters first. Add the cloves and the oil to your blender or food processor, and blend, scraping down the sides as needed, until the garlic becomes a smooth paste.
- Transfer it to a glass jar, smoothing out the surface of the paste, then drizzle enough oil on top to cover with a thin layer. This will help keep the air out and to better preserve the garlic paste.
- Refrigerate for up to two weeks. Whenever you use some of the paste, be sure to smooth the surface and top with a bit more oil.
Notes
I’ve found that most garlic paste recipes suggest using a neutral flavored oil, like canola oil, so that the oil doesn’t affect the taste of the paste. However, I personally prefer to use olive oil for almost everything, so I don’t hesitate to use it for my garlic paste as well. It’s really up to your personal preference!
To keep your garlic paste fresh and flavorful, it’s best to store it in an airtight container in the fridge. A small glass jar is a great option as plastic can hold onto strong flavors. To help prevent the paste from going bad, add a layer of oil on top as a protective barrier. It’s important to use it within 2 weeks or throw it away if it develops mold, off flavors, or colors. For longer storage, you can freeze garlic paste in a silicone ice cube tray and then transfer the cubes to a zip-top bag in the freezer. Another option is to scoop the paste into a zip-top bag, press it into a thin layer, remove excess air, and seal it before freezing. This way, you can easily break off pieces of frozen garlic paste when you need it.
If you want to make a small batch of garlic paste, your best options are to use either a mortar and pestle or a small blender. To make the process easier with a mortar and pestle, it’s recommended that you cut the garlic cloves into small pieces first. To add some extra abrasion power, you can add a pinch of salt and grind the garlic until it becomes paste-like. Personally, I prefer to add any liquids like oil after everything is ground up when using a mortar and pestle. This prevents any liquids from splashing everywhere during the grinding process.
Looking for some garlicky recipes to use that fresh garlic paste? Here are a few of my favorites –
- Ropa Vieja is a succulent, meaty, and savory Cuban dish, loaded with earthy spices and herbs, and spiked with just enough vinegar and briny olives to bring everything to life. Serious yumm!
- Shakshuka is a simple, easy-to-make, one-pan meal of eggs poached in a savory, spicy tomato and pepper sauce. It’s just as tasty for breakfast as it is for dinner, and makes a satisfying dish any time of day.
- The perfect garlic-laden accompaniment to Shakshuka is a fresh and fiery cilantro-based condiment called Zhoug.
- Kenyan Beef Curry is loaded with ginger, garlic, red onions, and succulent beef. It’s full of flavor and savory goodness.
Quick tip: One teaspoon of garlic paste is equivalent to about 1 large or 2 small cloves of fresh garlic.
- Prep Time: 15 minutes
- Category: Condiment